

- The most common mistakes in manipulated astrophotography images
- Tools and techniques to help you spot them
- How astrophotography pros take real stunning images without any trickery
We’ve all been there: we see a stunning astrophotography image that has gone viral on social media, showing perhaps a huge full Moon aligned with some landmark, or the Milky Way arching in the sky above some exotic location. But then we start second-guessing ourselves –– something doesn’t look quite right, yet we can’t put our finger on it. Image manipulation was already commonplace before the advent of artificial intelligence (AI), which is now flooding the internet with fake images at an alarming pace. In this blog post we will teach you how to spot some of the most common mistakes in manipulated photographs of the night sky, comparing them with real pictures from true astrophotography pros.
The Sun and the Moon
This may surprise you, but the apparent size of the Sun and the Moon on the sky is way smaller than you think: you can easily cover them with a finger held at arm’s length, with room to spare. And yet, astrophotographers often capture stunning images like the ones below, which show the Sun and the Moon rising behind ESO’s Extremely Large Telescope (ELT), currently under construction in Chile. These are genuine single photographs, captured in one shot on location, but how are they possible?
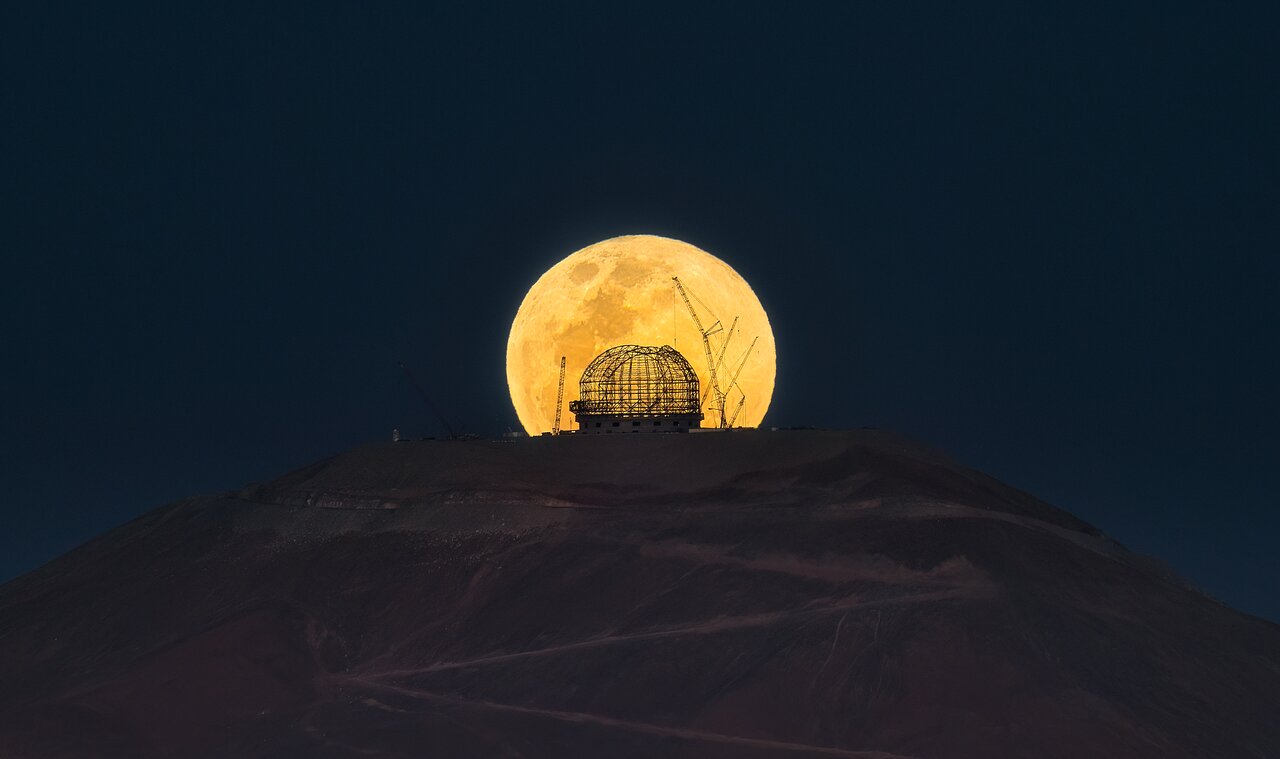
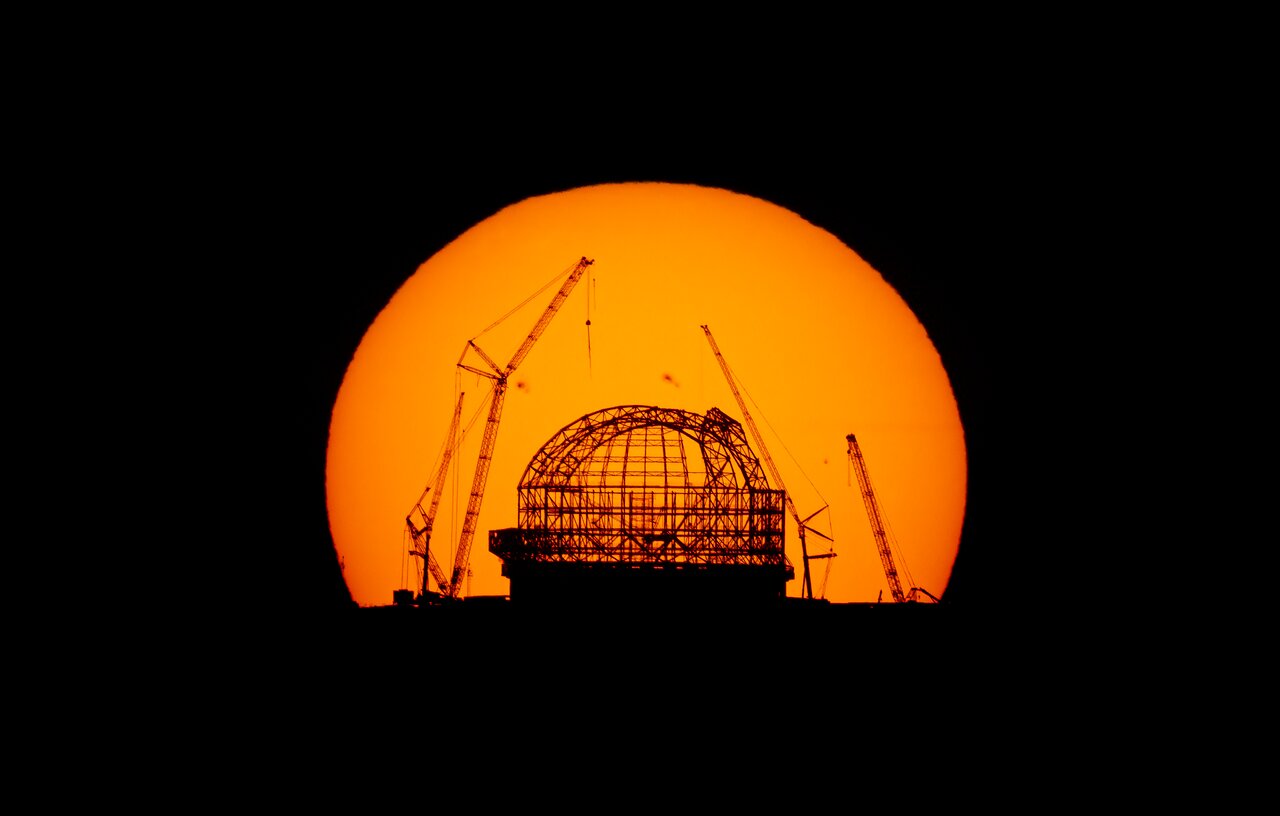
Here’s the trick: the apparent size of the Sun and the Moon is always the same regardless of your location. They are so far away from Earth that no matter where you are, they will always look the same size on the sky. Nearby objects like buildings, on the other hand, do appear smaller the further you are from them. So if you move far away enough, these objects can end up appearing as small as the Sun or the Moon. All you need then is a telephoto lens or a small telescope to zoom in and amplify the image.
An object of size S will have roughly the same size as the Sun/Moon when seen from a distance of 100 x S. So if a photograph contains a foreground object whose actual size you know, then you can easily work out how far away the photographer had to be to take that shot, and hopefully conclude whether the image is genuine or not.
Let’s put this to the test with the ELT images above. The ELT dome is 88 m wide, and the Sun/Moon are a bit more than twice as wide –– about 200 m. Multiplying that by 100 yields a shooting distance of 20 km. That’s indeed the distance between Cerro Armazones, where the ELT is located, and ESO’s Paranal Observatory, from where these images were taken.
Now take a look at the photograph below, featuring the full Moon behind the Big Ben in London. You can stack about 6 Moons on top of each other along the Big Ben, which is 96 m tall. So the Moon spans the equivalent of 16 m, meaning that the photographer had to be 1.6 km away to get this shot. Yet it is clear from the framing of the image that it was taken somewhere on the other bank of the Thames, only 200-300 m away from the Big Ben.

Something else to watch out for in this kind of images is whether the Sun or Moon look too sharp. When they are close to the horizon, their light goes through a big chunk of Earth’s atmosphere, which blurs and even squashes the images. But if the Sun or Moon look perfectly crisp, that’s often a telltale sign that they were added in.
Even in the absence of terrestrial landmarks it is often possible to spot when the Sun or Moon have been artificially added by comparing them with other celestial objects. For instance, the image to the left below is often shared on social media as an actual photograph of a solar eclipse seen from space. It is in fact a computer-generated image by artist A4size-ska, who openly discloses it as such. One of the giveaways is that the Sun and Moon are nowhere as big compared to the Milky Way, which you can see just below the “eclipsed Sun” in the image. Compare it with a real photograph showing the Milky Way in the sky (right), taken at the Atacama Large Millimeter/submillimeter Array (ALMA).
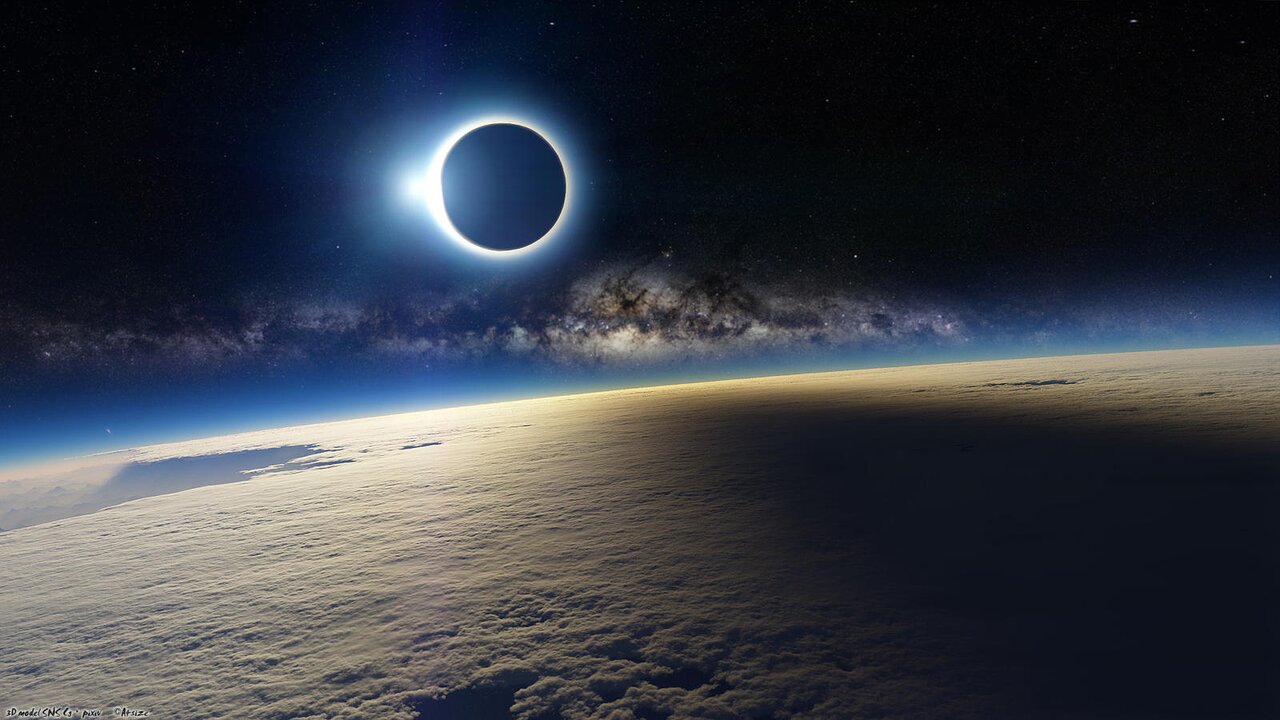
(FAKE) An artistic computer-generated image showing a solar eclipse from space. It was made with Terragen, a tool to render photorealistic terrains and environments. The Milky Way is a real image added into the composition.
Credit: A4size-ska. Milky Way image: ESO/S. Brunier. This image isn’t released under our CC-BY license.
|

What about the left image below? The Sun and Moon, beautifully framed here by two slender trees, don’t look impossibly large. Could this be a real shot? Look closer: the Moon is fully illuminated, which can only happen if the Sun is directly behind the camera, not in front of it. It is possible to see the Moon close in the sky to the Sun, but it looks like a crescent, with the bright side pointing to where the Sun is, like in the photograph to the right taken at ESO’s Paranal Observatory.
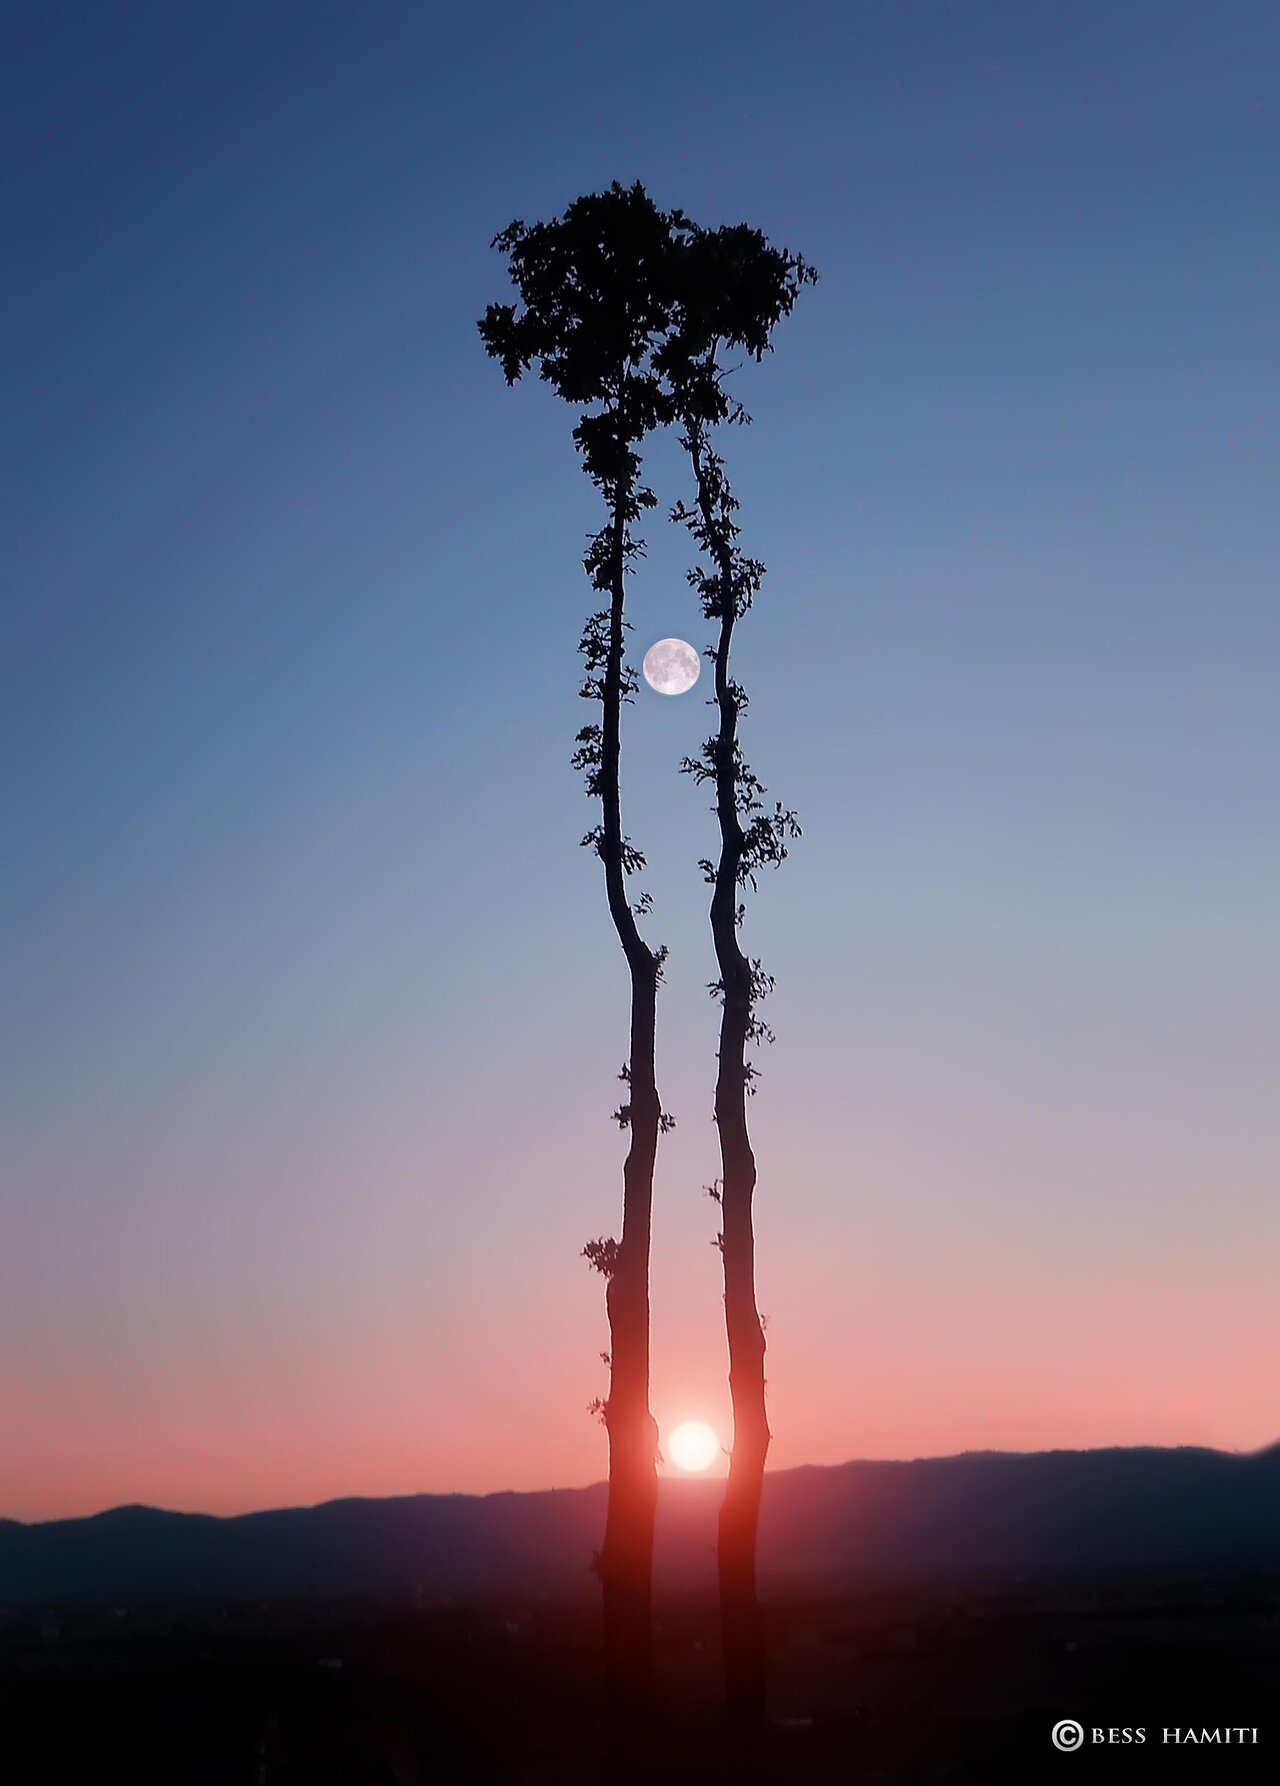
(FAKE) An altered image giving the impression the Sun and Moon are framed vertically by two trees. This image isn’t released under our CC-BY license.
Credit: Bess Hamiti
|

The Milky Way
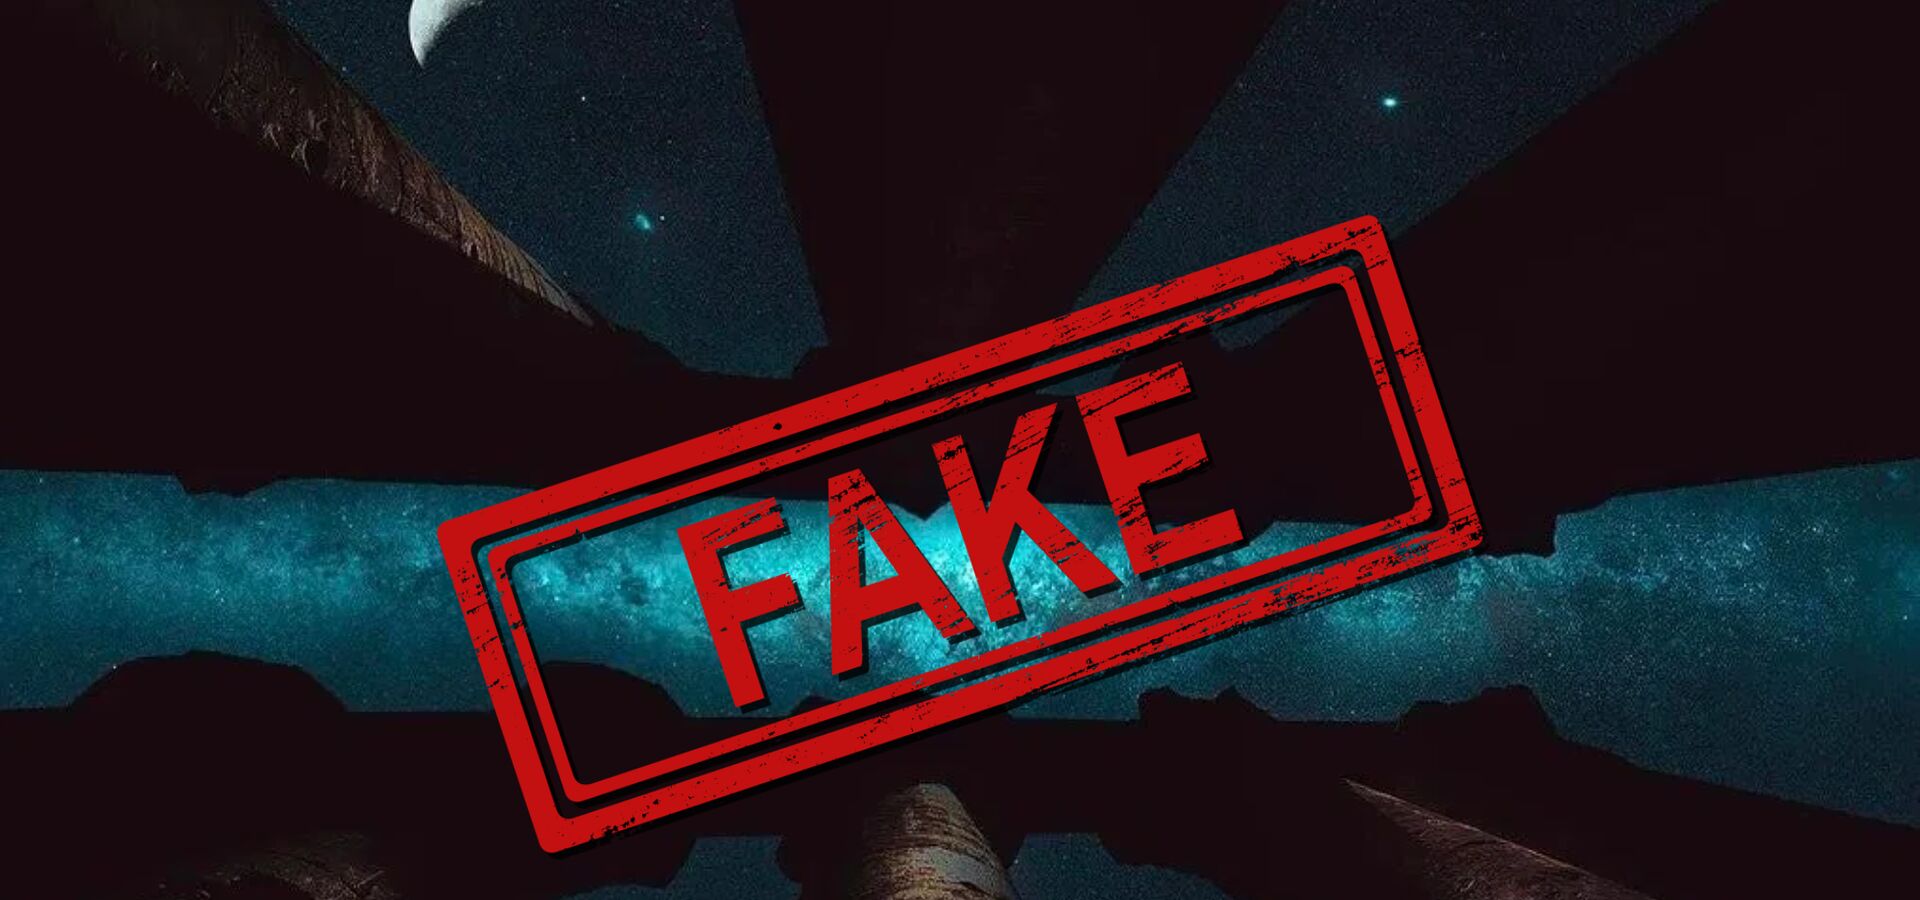
The Milky Way, our home galaxy, is another recurrent subject in fake astronomical images, and the image to the left below is a textbook example. It routinely goes viral on social media, and it purportedly shows the Milky Way perfectly aligned with the temple of Karnak in Egypt. This photograph is a bingo of every mistake you could possibly make when faking an astronomical image.
(FAKE) A manipulated image with the Milky Way supposedly aligned with the temple of Karnak in Egypt. This image isn’t released under our CC-BY license.
Credit: Unknown
|

First of all ––yes, you guessed it–– the Moon is ludicrously large (and also transparent if you look closely…).
Secondly, the brightest part of the Milky Way never crosses the sky directly overhead at Karnak. Our galaxy is a swarm of billions of stars arranged in a flat disc and a dense bright centre, similar to a fried egg. We’re located in the outskirts of the disc, and due to the way the Earth is oriented in space, the centre of the Milky Way appears higher up in the sky in the southern hemisphere than in the northern one.
More precisely, the centre can only be seen directly overhead from locations at a latitude around 29º South give or take, like ESO’s La Silla Observatory, as seen in the image to the right above. At Karnak, at a latitude 26º North, the Milky Way centre never rises higher than 35º above the horizon. And the further north you travel, the lower the centre it will be. Northward of latitudes around 60º North the Milky Way centre is always below the horizon. So if you ever see an image of the Milky Way centre from, say, Finland, you know it’s not a real image.
But wait, we’re not done with Karnak yet! Do you see that faint smudge to the bottom-left of the Moon? That’s the Small Magellanic Cloud, one of two dwarf galaxies orbiting our own Milky Way. These galaxies are very close to the south celestial pole, and they can’t be seen at all from Karnak –– they are pretty much an exclusive perk of the southern hemisphere.
Building your image fact-checking toolset
We’ve only scratched the surface of the most common mistakes in fake astrophotography images. It requires a lot of practice and a good understanding of the sky to spot these inaccuracies, a task that can often seem daunting. Luckily, there are many software tools at our disposal to simplify this job.
Reverse image search is an essential tool when fact-checking photographs, astronomical or otherwise. Uploading an image to TinEye or Google Images yields a list of matches that you can then sort by different criteria such as date, match quality, web domain, etc. For instance, doing a reverse image search of the Big Ben image we discussed earlier leads us to the original image without the Moon.
Stellarium, a free and open source planetarium software, is another must-have. It allows you to visualise the sky from any location, at any given date and time. Photopills and The Photographer’s Ephemeris are invaluable tools to figure out if and when the Sun or the Moon can be aligned with terrestrial landmarks, and how big they will look in comparison.
But sometimes the fastest route is just to check whether someone has investigated an image before. Websites and social media accounts like Snopes, HoaxEye, Fake Astropix and PicPedant are very reputable sources that debunk photo manipulation in great detail, including AI-generated ones.
Altered astronomical images, whether it is for legit artistic reasons, click-bait purposes or just for fun, are part of our online lives. We hope this brief primer on astrophotography forensics has set you on your way to become an image sleuth!
Links
Biography Juan Carlos Muñoz Mateos
Juan Carlos Muñoz Mateos is Media Officer at ESO in Garching and editor of the ESO blog. He completed his PhD in astrophysics at Complutense University in Madrid (Spain). Previously he worked for several years at ESO in Chile, combining his research on galaxy evolution with duties at Paranal Observatory.