High-cadence & high time-resolution observation
Science cases requiring high-cadence and high-resolution observations, such for instance fast temporal flux variations of x-ray transients, transits of extrasolar planets, etc., can be conducted by using the FAST PHOTOMETRY mode offered with HAWK-I. In this mode the fraction of time spent integrating is typically ~80% of the execution time and the minimum DIT is < 0.5 sec. This is achieved by windowing down the detectors to speed up the read-out and to decrease the overheads. In what follows we will show an example of fast photometry to timely monitor the transit of an exoplanet. Usually in these cases, the observer is interested in performing relative photometry, hence what matters is the difference between the magnitude of the target and of a reference source. Being both generally quite bright, such observing strategy does not involve any sky background measurements. However, even if in the following example we will stare on target to acquire many frames without moving away from it, the template we will use, i.e. HAWKI_img_obs_FastPhot, does allow you to jitter the object within a box - whose dimension is defined by the observer - and hence to be able to monitor the sky background whenever is needed.
Click here to go back to the HAWK-I main tutorial page where you can find other examples for HAWK-I observations.
0: Goal of the Run
In this tutorial we will prepare an OB that performs fast photometry in the Ks filter. Your goal here is to observe the transit of an exo-planet around a bright star whose coordinates are: RA(2000) = 10 06 10.35, DEC(2000) = +03 32 48.96. For convenience hereafter we will call the target HD87601 (Note: To the author's knowledge this is a fictional exo-planet).
The sample OB will illustrate the use of a variety of features of p2 and illustrate the kind of decisions to be taken at the time of preparing in advance an observing run, as well as some aspects that are specific to the preparation of OBs for HAWK-I.
1: Getting started
The Phase 2 process begins when you receive an email from the ESO Observing Programs Office (OPO) telling you that the allocation of time for the coming observing period has finalized and that you can view the results by logging into the UserPortal and clicking on "Check the time allocation information". Note that the username and password that you need to use for the User Portal are the same as those you will use to prepare your OBs.
You follow the instructions given by ESO and find that time was allocated to your run with HAWK-I. Therefore, you decide to start preparing your Phase 2 material. First, you collect all the necessary documentation:
- The HAWK-I User Manual
- The HAWK-I Template Manual
- The Service Mode instructions for HAWK-I
- The p2 Documentation
and you proceed with opening the p2 application in your browser. For the sake of this tutorial, we will use the p2 demo application: https://www.eso.org/p2demo
This is a special facility that ESO has set up so that users who do not have their own p2 login data can still use p2 and prepare example OBs (for example, while writing a proposal to get the overheads right!). Indeed, all users have access to the same facility, and each can see what all others have done. You cannot use p2demo to prepare actual OBs intended to be executed. When you prepare actual OBs you should use your ESO User Portal credentials for p2 (with http://www.eso.org/p2).
2: Your First OB
Now, you start with the definition of an OB for your science target.
2.1: Define an OB with p2
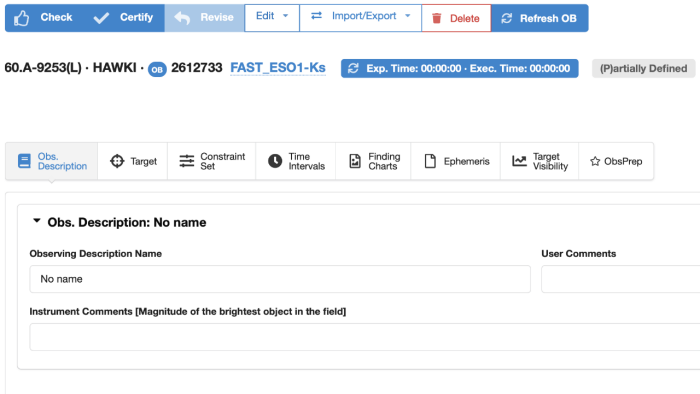
After browsing to https://www.eso.org/p2demo, the p2 main GUI will appear as follows:
Next, you will fill in all the information related to the observation by clicking on the different tabs (Obs. Description, Target, Constraint Set, Time intervals, etc.).
2.1.1: Obs. description - Filling in the Basic Information
OD (Observation Description) Name
It may be useful in many cases to have an easy way of identifying an OD (Observing Description), like when having observations of a number of targets performed with an identical instrument configuration and observation template parameters. The Observation Description Name field in the OB window allows you to define names for the ODs. The OD name appears in turn in the overview area of the p2 folder of this run, thus allowing the identification at a glance of all OBs sharing ODs with the same name. In this tutorial the observation description will define the Fast imaging observations in Ks-band. Thus, we enter the name Kfast-imaging in the OD Name field.
User Comments
The User Comments field can be used for any information you wish, to keep further track of the characteristics of the OB, to alert the staff on Paranal to special requirements, etc. Here, we do not have any special information or requirements and leave this field blank.
Instrument Comments
The HAWK-I specific field refers to the Magnitude of the brightest object in the field hence it must be used to insert the J, H, and K magnitude of the brightest star present in the 7.5' x 7.5' HAWK-I field. In order to retrieve this information you query the 2MASS catalogue. When querying the catalogue you can provide a search box size of 7.5' x 7.5', that is already a quite big area given that you will later window the detector. The query result tells you that the brightest object in the whole field has the magnitudes: J=8.1, H=7.3, K=7.7mag. You find out on the HAWK-I service mode specific webpage that this is too bright for HAWK-I observations. However, since you want to use the Fast Photometry mode with DIT much shorter than 1 sec (i.e. 0.15sec) and the detector windowed, you consult the Exposure Time Calculator to check the saturation level when using such a short DIT. Since you will not exceed the limit of 5 times the saturation level you continue with typing J=8.1 H=7.3 K=7.7 into the Instrument Comments field (Note: imaging observations leading to strong detector saturation are not scheduled in service mode).
2.1.2: Inserting Target Information
To access the window where you should provide the Target information click on the Target tab in the top menu.
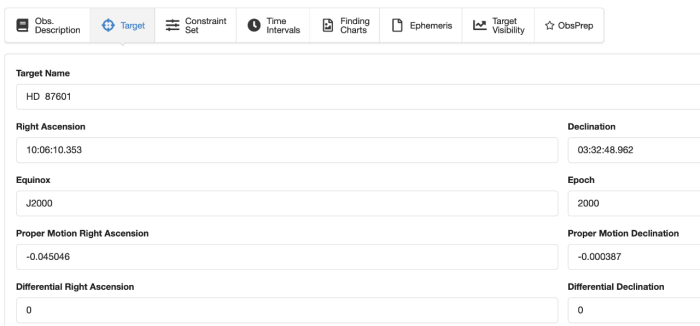
Here insert the target name, in other words enter HD87601. This can be accomplished by clicking on the "resolve" button to the right of the Target Name field. Doing so you will then see the window as shown below.
Please note a couple of things:
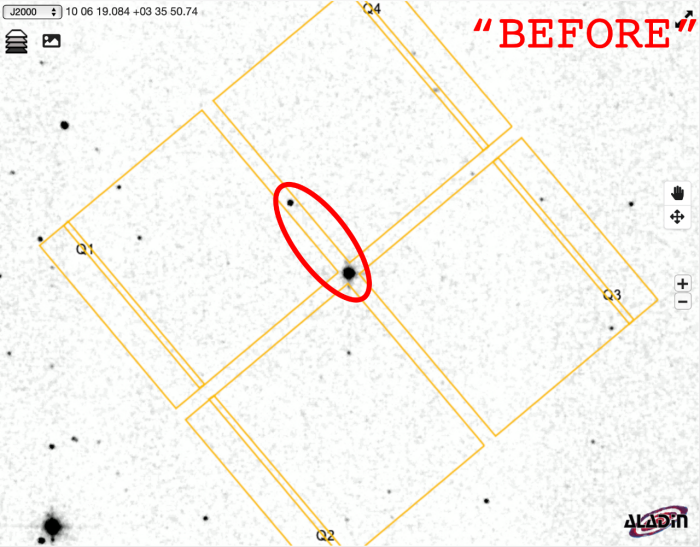
- In the absence of any further adjustments during acquisition the target will fall directly in the gap between the detectors! Fortunately, though, the fact that both target and reference star should fall in the windowed regions means that such after-the-fact adjustments will, by definition, be made.
- Once the adjustments referred to in the previous bullet are made the target coordinates will change as will the proper motrion values! While the former is OK, you should consider, at least, avoiding the latter. To do this, before making any adjustments to the values write then down and save them for later use.
You can double-check, or even further fine-tune the position of your target and reference source on the detector window by clicking the ObsPrep tab (see below).
2.1.3: Defining the acquisition template
The first template that must be part of any science OB is the acquisition template, so let us define it next. In the Template Type list, make sure that the acquisition entry is selected. Clicking the drop down menu on the right will list all the acquisition templates available for HAWK-I.
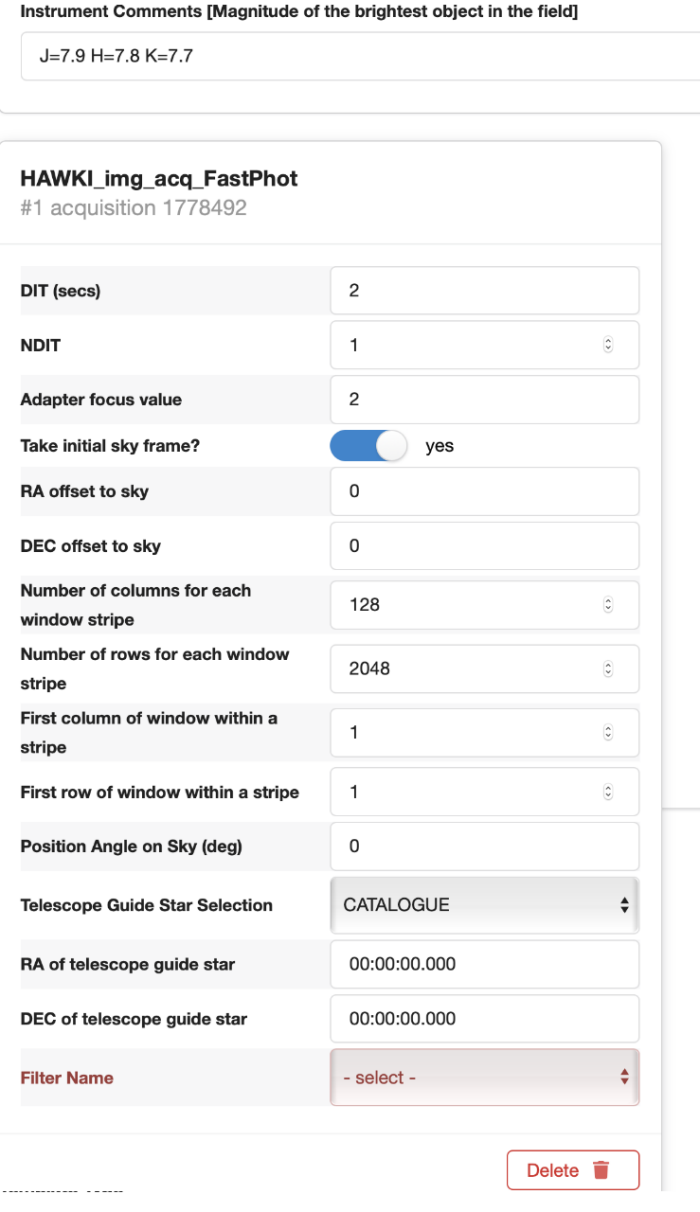
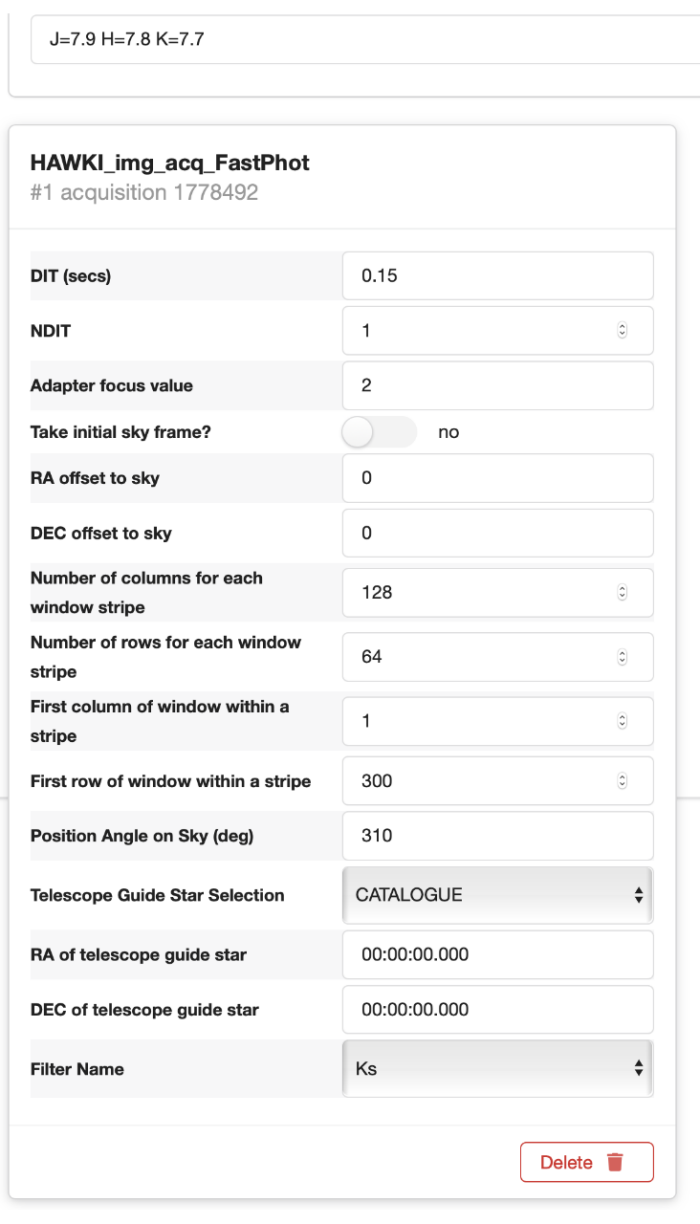
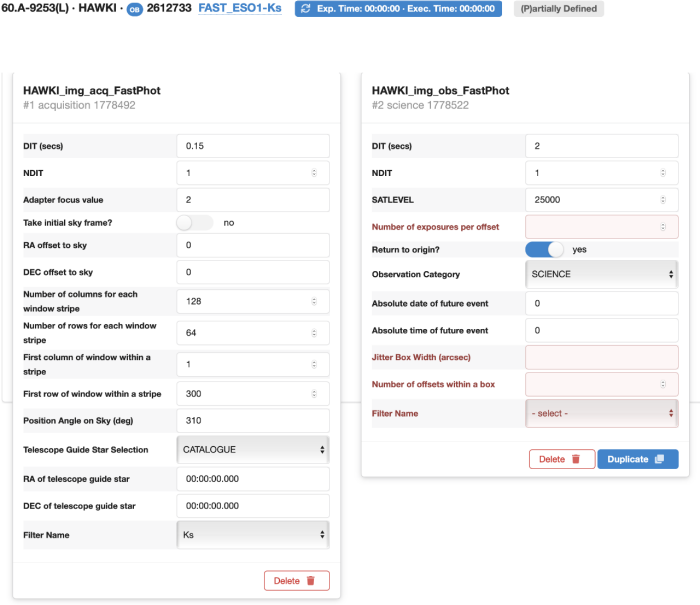
After reading the description of the templates in the HAWK-I template Manual, you have noticed that the HAWKI_img_acq_FastPhot template is the acquisition template suited for your purpose. Therefore you click on the template named HAWKI_img_acq_FastPhot from the list of possible templates in the Template list. Then, you click on the Add template button next to it. The window should now look like this:
Now you need to decide on the acquisition parameters, and if necessary, modify the default values given in the acquisition template.
The first fields to fill out in the acquisition template are the DIT (detector integration time for a single read) and NDIT (number of DITs to co-average) settings. Your decision for the values of DIT and NDIT depends on the brightness of the target. Your target is very bright, it is easily identifiable in a short exposure of 0.15 seconds at Ks-band. The target, however, is not too bright to be close to the saturation, in which case you would want to degrade the telescope focus (Parameter: adapter focus value) and hence you can leave the default for this parameter (see the User Manual for further information on when to use a telescope focus degrading). Moreover since the target is located in a sparse stellar field there is no need to take an initial sky frame to be subtracted from the science field hence, you then enter:
- DIT (secs): 0.15
- NDIT: 1
- Adapter Focus value: 2
- Take initial sky frame? : slider switch slid to no (the telescope will not move off target to take a sky frame).
The next two parameters of the acquisition template refer to the offsets in arcsec in case one decides to take an initial sky frame. Here there is no need for such offset so you enter:
- RA offset to sky: 0
- DEC offset to sky: 0
Next step is to set the parameters which will define the dimension and position of the windows within the 4 detectors. The detectors are read in 16 vertical stripes, spanning 128 x 2048 px each. A given window can be defined in each of the stripes but the location of the windows in the 4 detectors are not independent. This implies that you will only have to set up the windows in one detector, then it will be replicated in the other 3 detectors.
The choice of the dimension and geometry of the windowing is related to the selected DIT. The smaller is the window the shorter is the allowed minimum DIT. To properly sample the transit with high time-resolution you figured out that you need to use a DIT=0.15 sec. After checking on the HAWK-I User Manual the allowed minimum DIT for a given windowed configuration, you decide to use contiguous regions (i.e. the windows on the individual strips are as wide as the stripes themselves, so within a given detector there are no gap along the X-axis). Along the Y-axis you instead decide to go for a 64px wide, hence the actual dimension of the windowed region on each detector will be 2048 x 64 px. To do so you enter:
- Number of columns for each window stripe: 128
- Number of rows for each window stripe: 64
- First column of window within a stripe: 1
Note that because you are only interested in two sources (i.e. science target and reference star) which will fall both on the same detector, what will matter to you is only 1 windowed region (although the system will setup 4, one on each detector).
Now you need to decide where to place the window along the Y-axis. Such choice is tied to the distance of the reference star from your science target because you need to observed both sources to perform relative photometry. In this respect, the rotation of the field, which is defined by the parameter Position Angle on Sky (deg), is also very important for us because it will help us to properly place the science target and the reference source within the windowed regions. Given the separation between the target and the reference star you measure that by rotating the field by 310 degree and placing the windowed region along the Y-axis between px 300 and px 364 both sources will fall in the regions. So, you enter:
- First row of window within a stripe: 300
- Position Angle on Sky (deg): 310
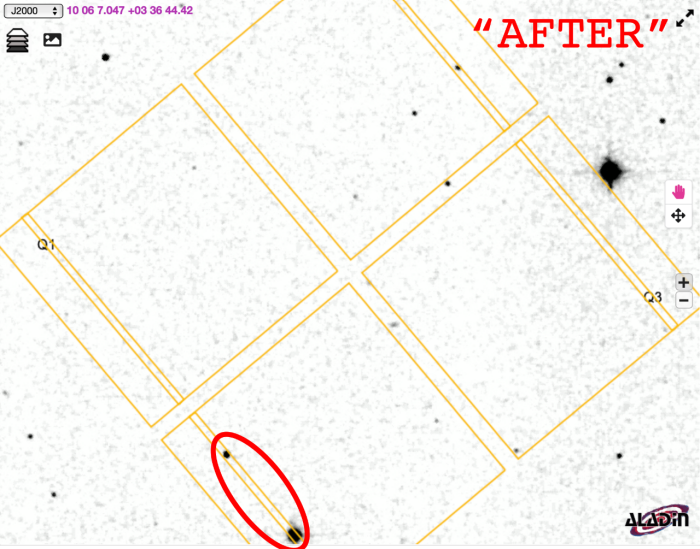
But, if you then consult the ObsPrep tab you will find that the target and reference object still fall in the gap between the detectors, and not on the slits defined above! (See the first image below, which we've labelled "BEFORE" and have circled the bright target and its less bright reference.) To rectify this it is simplest to drag the image in ObsPrep such that these two objects then fall on the slit, which we illustrate in the figure below which we've labelled "AFTER".
Note that as mentioned above the impact of making the ObsPrep adjustments is that the coordinates and proper motions now have the values:
- RA = 10:06:06.810
- DEC = 03:36:47.960
- PMA = 0
- PMD = 0
Next, you have to decide about the telescope guide star. It may happen that one wants to observe a region in a large dark cloud where no optically bright star is present that can be used for the telescope active optics guiding. In such a case the parameter Telescope Guide star selection must be set to NONE. However, in the large majority of cases, and also in our tutorial example, there is no problem for the telescope operator to automatically find a telescope guide star from the catalogue. Therefore, in most cases and so for our example here, this field can be left at its default value:
- Telescope Guide Star Selection: CATALOGUE (Default)
Only in case the Telescope Guide star selection is set to SETUPFILE the values for "RA/DEC of telescope guide star" (the next acquisition template keywords) are used.
Finally, you have to enter the filter that should be used for acquisition. It is recommendable to choose the same filter as you will use in your first science template to minimize the overheads, and because you decide that this will be Ks-band, you choose from the filter drop-down menu:
- Filter Name: Ks
Now the OB window should look like this:
2.1.4: Setting the Constraint Set
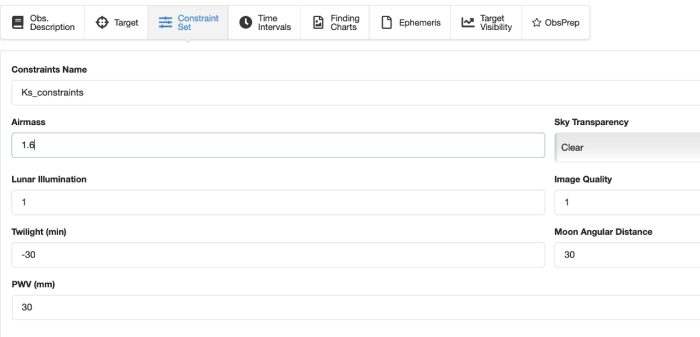
As stated in Section 1, we assume for the purpose of this tutorial that the program has been allocated time in Service Mode. You thus need to specify a set of constraints, which indicate under which conditions your OB can be executed. You can do this by clicking on the Constraint Set tab and start to fill all the entries specific to HAWK-I observations:
Constraints Name: give a descriptive name to the constraint set about to be defined. Since you have decided that this constraint set will be applied to all Ks imaging observations, you type Ks_constraints in the Name field.
Sky transparency: since you wish to perform relative photometry, you request Clear conditions in the Sky Transparency entry.
Image Quality: This is the requested image quality at the observing wavelength corresponding to the Turbulence Category requested at Phase 1. We will assume here that during Phase 1 you requested a Turbulence Category of 85% (seeing < 1.3", < 1.1" accounting for ground layer percentage). At an airmass of 1.6 this translates to an image quality of 1.0" in K-band (as indicated by the ETC), so you set the IQ to 1.0".
Airmass: set the airmass to 1.6 to ensure that your observations are not carried out at too low elevation.
Lunar illumination and Moon Angular Distance: since you are doing broad band observations in the near-infrared, the lunar illumination has very little influence. You can thus leave the default values of 1.0 and 30 degrees for the Lunar Illumination and Moon Angular Distance fields.
Twilight (min): Because HAWK-I is an infrared imager, observations of bright objects may be carried out in twilight. The twilight constraint can be used to define the earliest time with respect to the end of the astronomical twilight when the execution of the OB can be started. While the relation between the time difference from the evening twilight end and sun elevation varies during the year, for Paranal due to its low latitude this difference is small. Therefore the constraint is given in minutes as a difference in time with respect to the end of astronomical twilight (i.e. the time when the solar elevation is -18 degrees). The default value of twilight constraint is 0. A negative number means that it is allowed to start the observation before the end of the astronomical twilight. The twilight constraint can take values between -45 and 0 minutes. In this specific case, your observation can be done during twilight time, as soon as the Telescope Operator manages to acquire a suitable guide star (typically about 30 min before the end of twilight) hence you specify -30 as the value for the Twilight constraint.
PWV (mm): This parameter shall only be used for special requirements where a particularly dry atmosphere is needed. We leave the default parameter of 30 mm.
NOTE: In your Phase 1 proposal you already specified some of these constraints (lunar phase, seeing, and transparency). At Phase 2, you can relax your constraints to improve the chances of execution of your programme, but you cannot specify more stringent constraints. Remember that you can relax your constraints ONLY during the Phase 2 review process (i.e. when your support astronomer is reviewing your Phase 2 package) but NOT once the period has started.
The Constraint Set view window should now appear as follows:
2.1.5: Setting the time intervals
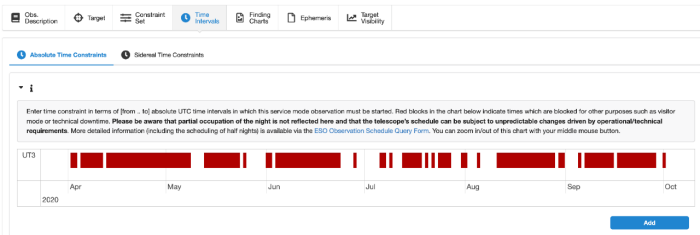
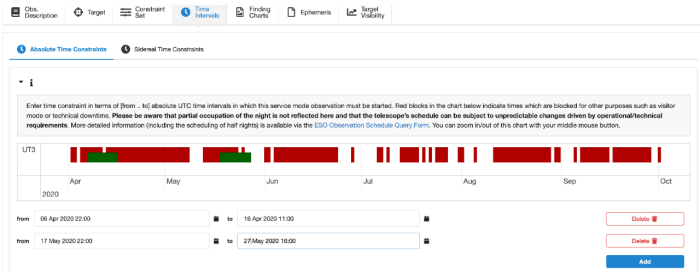
We will assume now that your HAWK-I observations are part of a larger multi-wavelength project and that the HAWK-I observations should be carried out simultaneously with some satellite observations that are performed in April between 06-04-2020 and 16-04-2020 and in late May between 17-05-2020 and 27-05-2020. You can specify this in the Time Intervals view window, which is accessible by clicking the Time Intervals tab. In thge figure below we show a representative display of what one might see when first clicking on the Time Intervals tab. We note that this is not what you would see when using one of the tutorials runs in p2demo for instance, owing to details of the underlying database content. In our example one sees a broken red bar.
As stated in the figure itself, red blocks indicate times which are blocked for other purposes such as visitor mode or technical downtime. Please be aware that partial occupation of the night is not reflected here and that the telescope’s schedule can be subject to unpredictable changes driven by operational/technical requirements. More detailed information (including the scheduling of half nights) is available via the ESO Observation Schedule Query Form.
To provide the first time window for the observation click the Add button. Two boxes will appear giving you the option to select the date and time of the start and end of the observation. Select 06 Apr 2020 22:00 and 16 Apr 2020 11:00 for Start and End date, respectively.
Then click again on the Add button and enter the second time window. The Time Intervals window should look like this:
As stated above, there is a possbility that those times that are shared between the red and green bars may not be viable for the observations as described here. There is less of a chance that they are non-viable where the green bars alone appear.
2.1.6: Defining the Obs.Description / Science templates
Once the sections Target, Constraint Set and Time Intervals are completed, the science template(s) can be inserted. To do so go back to the tab Obs. Description. In this example OB, we will insert only one science template as we wish to define an observing sequence of exposures with the Ks filter.
On Template Type, select now science. Clicking the right hand Template drop-down will list the existing HAWK-I science templates.
Now you have to make a choice between the different HAWK-I imaging templates and to use so you consult the Template Reference manual. You then realize that to run high time resolution imaging (i.e. Fast Photometry) you can only use the HAWKI_img_obs_FastPhot template. So you select it from the template list. Click on the Add Template button to attach the template to the grid below next to the acquisition template selected and filled previously.
The OB browser window should look like this now:
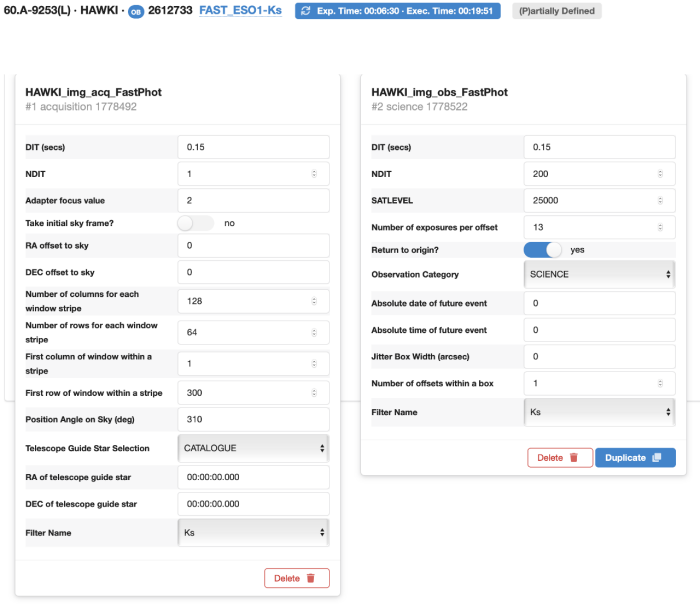
You have already decided to use a DIT of 0.15 and then, after consulting the Exposure Time Calculator to check the desired S/N, you decide to use a NDIT=200 and to take 13 exposures. The SATLEVEL keyword is set per default to 25,000 and you leave it like this. Because your target and reference star are bright and you will be performing relative photometry you don't need to spend time monitoring the sky background (by jittering or going off target). Your main goal is to constantly monitoring the transit hence you decide to stare on the same position and acquire many frames as possible (considering the 1 hour rule for the length of a single OB). The HAWKI_img_obs_FastPhot template thus has the following parameters:
- DIT (secs): 0.15
- NDIT (secs): 200
- SATLEVEL: 25000 (Default)
- Number of exposures per offset: 13
- Return to Origin ? : slider switch slid to yes (i.e., the telescope will return to the initial position after the execution of the template)
- Observation Category: SCIENCE (Default)
- Absolute date of future event: 0 (Default)
- Absolute time of future event: 0 (Default)
- Jitter Box Width (arcsec): 0
- Number of offsets within a box: 1
- Filter Name: Ks
You can already check the execution time of this OB by clicking the blue "Exp Time Exec. time" button at the top, just next to the OB name.
... and your OB browser window should look like this now:
2.1.7: Verifying the OB and setting its priority
Now to verify that your OB is free from error you can select the Check option from the action bar on the top, above the OB details. This will produce a log message report listing possible warnings and/or errors that you should take care of. If you have followed step by step this tutorial then the log message should not report errors, and just a few warnings.
You can now switch to the Overview window, where one line is presented for each OB, providing a summary of the main characteristics of the OB. You should see a summary with the following contents:
- Left most column: OB_ID and name: 2612733 FAST_ESO1-Ks
- Second column: blue tick
- Third Column: encircled P for (P)artiallyDefined
- ObsDescription: Kfast-imaging
- Target: HD 87601
- Constraint Set: Ks_constraints
- Acquisition Template: HAWKI_img_acq_FastPhot
- FindingCharts: (0)
- EphemerisFile:
In case your run contains more than one OB (very likely), you can select a priority for this OB which is currently set to 1 as default. The priority is a number ranging from 1 to 10, where 1 corresponds to the highest priority.
You can assign to your OB a priority by selecting the Schedule button just next to Overview. Under the Schedule subfolder you will see one line per OB, similar as in the Overview, with columns:
- Prio.: 1
- Abs. Time Intervals: 2
- Group Contribution:
- Earliest/Latest After Prev.:
Then, click on the number diplayed in the Prio column to change it to 3, because assume this OB has a rather low priority.
3: Attaching Finding Charts
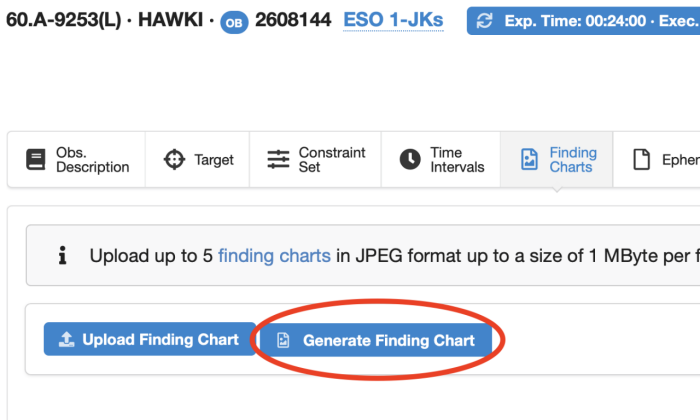
The next thing to do is to attach the respective Finding Chart(s) to the OB. The Finding Charts must be prepared as jpeg or jpg files and must fulfill all general and HAWK-I specific requirements for finding charts. You can use any tool of your choice to create the Finding Charts in jpeg, jpg format. p2, however, does contain such option! If you click on the Details tab on the top bar and select the OB by finding it in the right folder and clicking on it you will have access to the Finding Charts Button as shown highlighted below.
After clicking on the Finding Charts button you will see the Generate Finding Chart button as highlighted in the screenshot shown below (the OB_ID is different in that figure because the figure was "borrowed" from another HAWK-I tutorial).
Clicking the Generate Finding Chart button will result in two finding charts being generated (with somewhat differing scales) showing the acquisition position.
4: Finishing the preparation and submitting the OBs
With the completion of the OB, we consider the example developed in this tutorial to be finished.
Once you are sure that you do not want to apply any further modifications to the OB, and after you have checked the correctness of the OB by clicking the Check button, you can proceed to lock the OB. For this go back to the "details" view of the OB and click Certify on the top action bar. A report will appear informing you whether the certification was successful or not. If you followed this tutorial closely, the report will display a green thumb up and report Your OB is observable.
Our tutorial with this example of creating the HAWK-I OB for high-cadence FastPhotometry observations ends here. For the preparation of the
Phase II material for a whole run, more OBs may have to be created.
Furthermore, the complete Phase 2 package lincludes also the README
file. To access the README file you must click on the run folder and
then select the readme file tab. A tutorial for the README file is
available here.
When all the OBs and the README file for a given run are ready, you
should press the Notify ESO button with the megaphone symbol, which is
explained in more detail here. In the context of this tutorial please do not press this button.
As a courtesy to the next user who follows this tutorial, we would like to ask you to finish these exercises by deleting the OBs that you created. For this please do the following:
- Select an OB that should be deleted
- In the Browser window click the revise button from the top action bar
- Click on the Delete button available also from the top action bar
In this way the OBs will be removed from the ESO Database.
Click here to return to the HAWK-I main tutorial page.
Instrument selector
p2 Documentation
HAWK-I p2 tutorial
- 0: Goal of the Run
- 1: Getting Started
- 2: Your First OB
- 2.1: Define an OB with p2
- 2.1.1: Obs. description - Filling in the Basic Information
- 2.1.2: Inserting Target Information
- 2.1.3: Defining the acquisition template
- 2.1.4: Setting the Constraint Set
- 2.1.5: Setting the time intervals
- 2.1.6: Defining the Obs.Description / Science templates
- 2.1.7: Verifying the OB and setting its priority
- 2.1: Define an OB with p2
- 3: Attaching Finding Charts
- 4: Finishing the preparation and submitting the OBs


