
e3p6opsPomMes
After M1 recoating or after any optics element has been removed and reinstalled (M1, M2, Adapter, Instrument, etc.), a new pointing model has to be set. Once the corresponding Telescope startup is done, select and point telescope to a star around zenith from the FK5 catalog. Use the IM camera (fiber).
- Confirm that the Optical Axis is close to the fiber by rotating the adapter by 90 degrees. If not, do corrective actions to the optic path.
- If the star is too far away but the optical axis is OK, do manual corrections to ID and IH terms (follow Correction Coordinate procedure).
- IF the star is within the tolerance range, skip to the pointing measurement sequence.
- Warning: Tip-tilt table must be off and at park position!
Determine the Optical axis (The rotator power must be ON, not apply with HARPS)
The reference position is the telescope optical axis or the image point were the rotation is zero. It has to be determined whenever is possible by the adapter rotation.
- Move Guide-probe to center position.
- Select any star in the ccdTEC field and center it using telescope offset
- Do adapter rotation to the instrument default position and measure the X1,Y1 star position
- Do adapter rotation of +/- 180deg. then measure the X2,Y2 star position
- Move star to [(X1+X2)/2 ; (Y1+Y2)/2] using telescope offsets and re-measure the X2,Y2 star position
- Do adapter rotation to the instrument default position and measure the X1,Y1 star position
- Move star to [(X1+X2)/2 ; (Y1+Y2)/2] using telescope offsets and re-measure the X1,Y1 star position
- Repeat points 4 to 7 until there is no star rotation
- If the reference position is not the ccdTEC center, the Guide-Probe center coordinates have to be re-measured. So just move the guide-probe until the star be in the ccdTEC center and writedown the new guide-probe x,y center in mm. As this new numbers have to be hardcode by SWC, use the NR-Request option to notify them.
Correction Coordinate
Select and point telescope to a star around zenith from the FK5 catalog. If it is not in the field, note the coordinates after the preset and do the standard search procedure. Calculate the offset in alfa and delta once you get the target on the reference position. On w3p6tcs account tcs open a xterm and do:
- cd /vltdata/config
- Copy cp pomCA.dat pomCA.dat_yyyymmdd (back up of current pointing coeffcients)
- Edit the ID and IH terms in file pomCA.dat with emacs or other text editor emacs pomCA.dat
- Modify pointing terms ID and IH (iterations may be needed, due to four possible signs alternatives)
ID = ID - [ Delta_Offset ]   ; Remember offset to the South are negative
IH = IH - [ Alfa_Offset  ]   ; Remember offset to the West  are negative

To avoid confusion do it one by one
- On emacs do save file
- On TCS status panel do trkws OFF,INIT,ONLINE ; this should reload the pomXX file to the axis LCUs
- Do preset again to the same target and check again sign and offset
- Repeat point 3 to 6 until be Ok, e.i target on reference position (less than 10 pixels)
Warning: If ID is out of the -300 to -500 range or IH is far from the 200 to 400 range, it means that a component is not back in the right position and IQ will be affected.
Pointing Measurments Sequence
Pointing measurement and corrections should be done regularly during technical nights. From any xterm on w3p6tcs user cam type e3p6opsStartPomMes &. This procedure will run a remote shell on w3p6tcs to open the e3p6opsPomMes panel and locally will open the panel e3p6opsRtd2.
On e3p6opsPomMes Panel do:
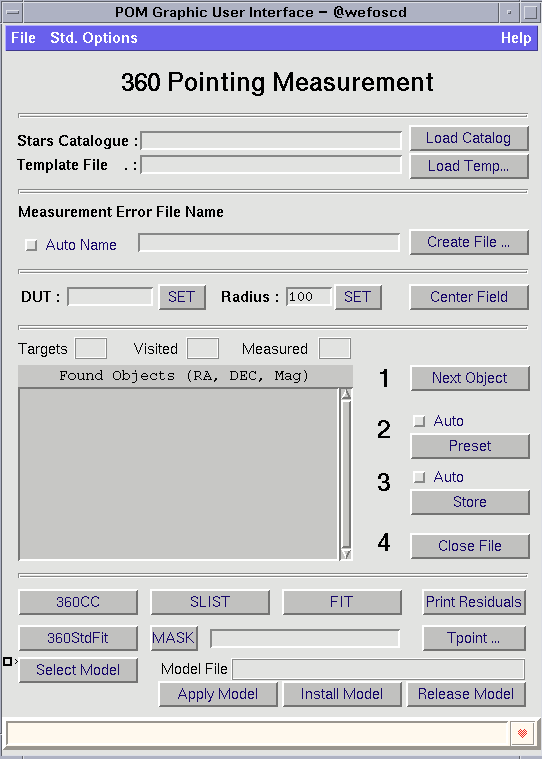
- Press Load Catalog to load Stars Catalogue (Use .../pointing/ fk5.tcs)
- Press Load Temp.. to load any of the following template files:
- /sci/facilities/lasilla/telescopes/3p6/pointing/TEMPLATES/360PointingTemplate.tpl
( more than 50 points) - MeridianSixStars.tpl
(quick ID,CH measurement) - pomTemplate24.tpl
- /sci/facilities/lasilla/telescopes/3p6/pointing/TEMPLATES/360PointingTemplate.tpl
- Press check button Auto Name
- Press button Create file
(Output error file) - Set DUT
- Check radius = 100
- Check button Auto Preset
- Check button Auto Store
On e3p6opsRtd2 Panel do:

- Select Camera ccdIMG F8
- Select Centroid method (Standard, Threshold, none)
- Press TCCD Setup Button
- Check Camera button ON (Guiding camera have to be in infinite loop)
- Adjust image scale and cuts using Autocut and Scale buttons
- In the Reference Position (fibre for HARPS) entry fields, write the X,Y coordinates and press
button "Draw Box". - Box size by default is 50pix.
Measurements
- On panel e3p6opsPomMes press Next Object button to start the measurements sequence. An automatic searching procedure - according to the template file - will get the Telescope coordinates and will move it to the first one on list.
WARNING:As the Auto Preset and Store commands are set, do not go through the list - Wait both telescope and dome preset done i.e Tracking then on panel e3p6opsRtd2 press button ObjectToBox and move cursor to the target and click on it. The needed telescope offsets will be applied to bring the e star on the reference position.
NOTE: If the start is not on the TCCD field, skip to point 3. This action will produce a pointing error vector equal cero on the measurement file and it won't be taken in account for the pointing analysis. - On panel e3p6opsPomMes press button Next Object to measure the telescope position and save it into the file before going to the next target from the template file list.
- Repeate points 2 and 3 to complete the template list.
- To finish press Close File
On Line Pointing Analysis
Press button 360StdFit to run the 360 tpoint procedure fit. Check the new graphic panel with the pointing error fit and the xterm to see the RMS result. If there are points to edit use button SLIST and MASK to list residuals and to mask bad points. Suggested option is:
mask R > 30 as long as two stars maximum have an error bigger than 30 arcsec
Stand-alone Pointing Analysis (tpoint command line)
Because TPOINT 7.8 version bug, remember that the MA terms has the wrong sign.
- Open a xterm
- cd /vltdata/pointing
- Look for the last data file name just typing ls -1tr DATA/*
- tpoint
- indat DATA/[--lastdatafile--]
- call f8
- slist to list residuals
- To edit points use mask n , where n is the slist row number
- Use fit to fit the new slist
- call e9 to plot residuals
Apply Model
To check new model just press button ApplyModel. The new pointing term values will be download to the axis LCUs If all OK, press button Install Model to have the new model saved either on w3p6tcs:/vlt/data/config/pomCA.dat or
w3p6tcs:/vlt/data/config/pomIM.dat